Tampilkan postingan dengan label Decor on a Budget. Tampilkan semua postingan

The Two-Day Powder Room

Posted by sew4tejhtr6ier Minggu, 08 Desember 2013 0 komentar
We like to believe that it is our biggest rooms that have the greatest impact when it comes to decorating, but I find that it's the small spaces that I love to makeover the most. First off, who says a small space can't have a big impact? And then there is the benefit of completing a small makeover in a day or two and feeling that sense of accomplishment with a fraction of the money in a fraction of the time. 
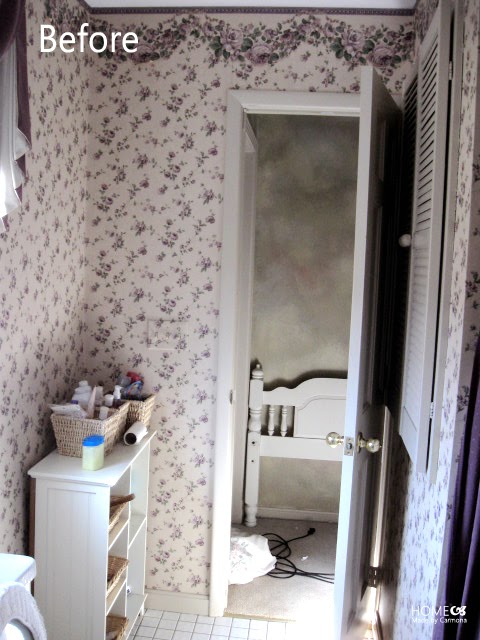


Powder Room Before
Let me start by saying that there was nothing terribly wrong with the function of this bathroom. It functioned just fine, and I suppose some people would have liked the wallpaper. However one of my little girls took it upon herself to be "helpful" and prematurely peeled the curling wallpaper border along the base. *sigh*...kids. I suppose that means it's time for a makeover, and guess what little person has to do most of the low wallpaper peeling? Do the crime, do the time! 


Wallpaper removal took a grand total of 2 hours using some simple steps you can read about here


Lately I've noticed I seem to have gained an obsession with dark walls...I've probably pinned a hundred incredible photos of gorgeous charcoal and navy colored rooms! Mmmmmm, a nice dark navy with big bold pieces of gold leaf art.... *drool*  Well I decided to indulge that obsession, just a little bit. *grin* It's a small space, so it can't hurt! You can imagine how thrilled I was to find a deep blue Glidden paint color in the oops/discount section at Walmart for $12... yes, that is 50% off the regular price! Cha-ching!!

Of course, those big blue walls just don't do justice without being complimented by some art to make them both pop. I found deeply discounted frames at Joann's Fabric Store and spray painted them with Krylon metallic gold paint.


These lovely prints I found free online at vintageprintable.com . For the elephant print go here, for the giraffe print go here
Accessories
Target is my kryptonite. You should have seen me with my little $10 Mypoints Target gift card, flying around the store in a blissful tizzy, my 3 kids in tow. I kept putting items in the cart, then running them back when I found something I wanted more! *giggle* 
I finally settled on this marble salt bowl priced at $3.98 marked down from the original $7.99. Forget the kitchen, this would be my ideal soap dish!


I also found this awesome metallic soap dispenser at Target for $12.99, but it rang up for $9.99, and when I told the cashier, she just shrugged and said "that's what it rang up for". Be still my frugal heart! *beaming* After using my $10 gift card, I only had to pay for the marble dish and the rug!


While working on the upstairs bathroom I painted some decorative bowls a gorgeous metallic gold, and while my trigger finger was gold paint poised, I painted one extra little Goodwill bowl just for good measure (or because I'm now obsessed with this gold paint...you choose).


I had such a great time making DIY Lulu & Georgia inspired rugs for both of my bathrooms, but I particularly love this Dot rug. Thanks again to Target's kitchen section (ha! there is more kitchen in my bathroom than bath goods!), I was able to find a plain mat for $7.19... that makes this DIY rug an inexpensive winner at $9!  


Powder Room Budget Breakdown: 
Keep in mind that I just made-over my girls Jack & Jill bathroom on $83, so this bathroom needed to be...well, cheap. Here are all the details on how I refreshed this little 1/2 bathroom on a total of $36!


  • Bath Rug - $9: Target rug, $7.19 (after 10% reduction for damage). Folkart acryllic paint from Walmart $1.77.
  • Wall Art - $10: 2 frames from Joann Fabric Store (60% sale off + 25% off coupon) @ $4.89 each. Prints $0 (prints found online, Staples enlargement 49 cents each before staples rewards).
  • Accessories - $5: 1 soap dispenser from Target $0 ($9.99 before using a $10 Mypoints gift card to Target). 1 marble salt dish from Target (marked down) $3.98 ...(minus a 5% discount). 2 bowls/dishwear from Goodwill 50 cents each.
  • Wall Paint - $12: From the "Oops" discounted section at Walmart (was 50%)
  • Miscellaneous Project Materials - $0: Already owned. Includes painting tools, and spray paints. 


  • Baca Selengkapnya ....

    Jack & Jill Bathroom Reveal

    Posted by sew4tejhtr6ier Rabu, 27 November 2013 0 komentar
    This bathroom makes me soooooo happy! I seriously avoided passing this bathroom because it made me anxious and frustrated. My girls had a hard time keeping it tidy, and it seemed to get uglier every time I saw it. Now with some careful planning it is pretty and practical! But wait, I've saved the best for last, this bathroom was decorated and organized for a grand total of $83. Some of you who have tracked how much they spend on a single room know how little that is, and how ridiculously hard that was! *grin*  This just goes to show that a little elbow grease, and some paint can go a long way!

    Budget Breakdown
    There are a few items I managed to get cheap or free, so you may want to factor in a little extra...but here are all the details of what I spent on this bathroom, and a few extra details you may need to plan your own inexpensive bathroom makeover! Ironically, the most expensive part of this makeover was buying storage baskets. 
    • Bath Rug - $9: Target rug, $7.19 (after 10% reduction for damage). Leftover paint, $0. Painters tape, $1.29. 
    • Shower Curtain - $10: Fabric bolt $7 from Habitat for Humanity Restore. $3 for thread and 1 spool of ribbon.  
    • Wall Art - $10: 3 Walmart frames, @ $1.97 each. Goodwill materials & frames, 50 cents each. Staples prints, $0 (after staples rewards...49 cents each w/out reward). Braces, $1.19 (also used on vanity).
    • Storage & Accessories - $32: 3 baskets from Kohls (with coupon), $28.86. 3 bowls from Goodwill @ $1 each. 3 bowls previously owned $0.
    • Hardware - $11: 2 Gatehouse brand handles @ $2.91 ea. and 3 hooks @ $1.98 ea. from Lowes (less one 10% off total purchase coupon). 
    • Wall Paint - $12: 50% off Glidden paint from Walmart's discount paint section.
    • Vanity Paint - $0: Leftover from coat closet project.
    • Miscellaneous Project Materials - $0: Already owned. Includes painting tools, gel stain, gold spray paint, sheets, and white paint. 

    Before & After
    There is simply nothing more satisfying than seeing all your little projects come together at the end of a makeover. Well, let me use the term "end" loosely, you know DIY'ers, we just don't seem to be able to rest. *chuckle*
    This bathroom truly is a compilation of small projects, all simple but effective projects. These are the items that serve a purpose, however that doesn't mean they can't be pretty as well. These small projects are also the key to decorating as cheap as possible, otherwise buying these items, even at sale price will run you up a pretty penny in the end.

    Project Links:
    THE PAINTED VANITY | HOW TO STAIN A BASKET | GOLD STORAGE BOWL DIY | RECESSED BATHROOM STORAGE | BATHROOM ART ON A $10 BUDGET | DIY HAIRCLIP HOLDING ART | DIY SHOWER CURTAINS | LULU & GEORGIA INSPIRED RUGS

    View from the hallway before and after.


    View from the bedroom before and after.


    View of the shower curtain before and after.


    Bathroom storage before and after.


    Bathroom vanity before and after.


    Link Love


    Baca Selengkapnya ....

    Lulu & Georgia Inspired Rugs

    Posted by sew4tejhtr6ier Minggu, 24 November 2013 0 komentar
    The other day I was over at Lulu & Georgia, drooling...as usual. Is this my life? To be spent admiring items beyond my means? Drat my ridiculously good taste! *lopsided grin*
    This gorgeous Paint Dot Rug and Arrowhead Rug are positively calling my name, but since they cost more than I spent to makeover my entire bathroom, I guess I'll have to settle for a DIY version. 

    Materials & Cost
    I was thrilled to find these washable cotton kitchen rugs at Target. They absorb the paint well, have plain white backsides, plus I was able to get 10% off because they all had speckles on top! Yep, in my world every cent counts! *wink*
    Because I am using the backside of these rugs, it kind of makes these rugs reversible! The paint will not soak through to the other side, so if you wanted you could paint different designs on either side and get two styles for the price of one!
    • (Target) Kitchen Rugs - $7.19 each
    • (Walmart) 1 Folkart metallic paint, 2 fl. oz. - $1.77
    • Leftover Interior Wall Paint, 1/2 cup 
    • 3/4" Painters Tape
    • Sponge brush &/or paint brush
    I did not count the interior paint, tape or brush in my final cost for making these rugs since they are items we probably all have lying around...but if you do not have these items you should factor another few bucks into your budget.


    Creating An Arrowhead Inspired Rug
    Start by creating a chevron design on the rug with your painters tape. Find the middle of the rug and work outward. Oh, and really press that tape down good...I had a couple areas where I pulled the tape up then didn't press it back down properly and the paint bled a bit more than I liked.
    Cut your tape strips to equal lengths, this will ensure some consistency of pattern.


    You could eyeball a chevron design, however if you really want to keep some consistency, cut out a triangle to use as a taping guide.


    Continue the chevron design across the entire rug, keeping a 2 inch space between each chevron layer.


    Once you have created the chevron design, cut long strips of painters tape in half and tape them across the tips of the chevrons.  


    Dilute your interior paint with a few tablespoons of water before painting your rug. You want the paint to be more like a dye than paint...this prevents the paint from drying hard and cracking. It also makes this rug hand washable! The first couple washes use diluted vinegar to soak it and allow any excess coloring to run off.


    Peel the tape back before the paint has dried completely. Here is a shot after all the tape was peeled off, but before the paint had dried...it will be a bit blotchy until it dries.


    I love my new folksy Arrowhead rug. 


    See the entire $83 Jack & Jill bathroom makeover reveal here. It is the small projects like this one that keep your budget on track, but make for a great finished space!

    Creating A Paint Dot Inspired Rug
    The irregularity of the dots are what really make this rug. Sadly this particular type of irregularity does not translate too well into DIY...it just looks like you couldn't paint a circle! *chuckle* Plan for your circles or ovals to be much more precise. If you really want that imperfect look you do have two options: 1. You can create an intentional irregularity within a stencil and then keep each painted dot consistent with the last. 2. Make your ovals/circles more precise, but vary their distances and angle slightly.


    The normal course of action would probably be to create your own oval stencil. And what stencil could be easier to create? I don't currently own any stencil materials, so sometimes you have to break out what you have. I used the ring of a canning jar lid and squished it slightly into an oval shape. I cut 4 slits so that it would be able to lay flush on the rug surface. Once you find the center of your rug, start there and work your way outwards, eyeballing an equal space between each oval.


    I used the sponge brush to quickly fill in the middle, then a smaller paint brush to be sure that all the edges were well covered.


    I admit this is no Lulu & Georgia, but I love this rug in my downstairs bathroom! It adds just the pop of design and color needed.  


    And there you have it! Two Lulu & Georgia inspired rugs. I may be using mine in my newly made-over bathroom spaces*, however these would be just as lovely in a kitchen, laundry room, entry, or any other space!

    *See the entire $83 Jack & Jill Bathroom Makeover here, or the $36 Powder Room Makeover here. These rugs were just the icing on the cake! *wink*


    Baca Selengkapnya ....

    Bathroom Art On A $10 Budget

    Posted by sew4tejhtr6ier Kamis, 07 November 2013 0 komentar
    This bathroom makeover is on an extremely small budget, which means I'm going to need extremely small budget art. Sometimes you have to be a little clever and do a lot of mixing and matching to get your desired effect on a minimal budget.


    Cheap Frames
    I picked up some cheap frames from Walmart. Yep, let's call it what it is...cheap, not just inexpensive, cheap. The set of 3 identical gold frames aren't even painted wood, just some mdf wrapped in printed paper, and it didn't even come with glass or a backing. Of course, they came in the golden hue I was looking for, and I couldn't beat the price at a $1.97 each.
    So how do you create an art arrangement without glass or backings? Well, I made a visit to my local Goodwill and picked up a few really ugly framed art for 50 cents each in the same general size as my Walmart frames! Sneaky huh? I now have glass, mattes, and backing for my new frames. It doesn't even need to fit exactly, see the tiny gap? It doesn't seem to make a difference once the tabs from the Walmart frames are pushed down.


    I was pretty thrilled to find two other (much nicer) frames for 50 cents each (yay for half price day!)...I love Goodwill! 

    Making It Pretty
    Bring some quality to your art with the little things. Matte for one, a double matte always looks more professional than a single layer. I salvaged a few black and off white mattes to pair with the ones I got from the Goodwill pictures. 


    Don't stop there! Thrifted frames can often use a little something-something, like spray paint, or super glued bling! *grin* I used a few braces to style the painted vanity in this bathroom, and I wanted to repeat it in another area of the room. I think it would have made an even greater impact with gold braces on a black frame...but since we are going for gold on gold in this bathroom...


    With this frame, I sprayed it gold then rubbed it with some gel stain. A final coat of clear protective spray, it was ready for its debut! In the next post I'll share how I turned it into a hair clip holder!


    Free Prints
    Maybe it's just me, but I seem to have horrible luck when it comes to finding great art. I sift through Etsy, then get scared off by the idea of paying $20+ per print. Not that there aren't rooms I want high quality art in, but let's be realistic...when you crack open some pretty framed print you found for $50 at a home decor store, you might be surprised to find a flimsy piece of paper that has been printed on, and often a matte with a painted rim made to appear that it has been double matted! It gets me every time!
    Sometimes you can find lovely prints that are public domain online. I decided for this project to only use prints from a great website called Vintage Printable. Here are links to all the prints I used (and a few I considered)!

    Home Printer vs. Professional Printers
    You can easily print these pictures from home, but if you don't have a special photo quality printer, you might want to save your ink and take them to your local office store. Of course, it depends on the print... prints with a lot of black or dark colors seem to do better printed from a professional printer, as do prints of photos. However, if you like the muted colors and it is a print of a painting, you might prefer to save your pennies and print from home. I started by printing mine out at home, but took three prints to Staples to preserve the dark hues and get a smoother print.


    Testing The Arrangement
    I like to hang my frames before deciding which print will go where. Sometimes you get them up there and aren't thrilled with the compilation. Use a little painters tape (or regular tape at the very edge) to see the grouping and figure out what you like.


    My first take... I really liked the butterfly, but it didn't make the cut after adding a matte. Two others were also cut, while others where simply moved around until they complimented each other properly.


    Some people consider art the icing on the cake, the cherry on top, the finishing touch. Well, I may not be finished with my bathroom makeover, but sometimes the art helps set the style and tone of the space and needs to come just before extra decorative touches. 


    Project Cost Breakdown
    • Walmart frames: 3 @ 1.97 ea. = $5.91
    • Goodwill pictures (frames, mattes, & glass): 5 @ 50 cents ea. = $2.50
    • Staples prints: 3 @ 49 cents ea. = $1.47 (minus my Staples reward = $0)
    • 3 extra mattes: Salvaged from old photos I already owned and hated = $0
    Not too bad for an under $10 project right?


    Baca Selengkapnya ....
    Trik SEO Terbaru support Online Shop Baju Wanita - Original design by Bamz | Copyright of wallpaper murals.